

Author
Enrique Rodriguez
Before a feature is rolled out to production, it has to pass through a sequence of test phases. These are executed in four different environments: the developer workstation, the continuous integration server, the development environment and the staging environment. Let’s see what happens during each step, to help us detect any problems in our Java apps.
Phase 1: Developer workstation
Unit tests
We prefer to write our tests after we finish coding, rather than follow the Test Driven Development (TDD) model. There is a myriad of articles, both in favor of and against TDD, but we believe that enforcing its use may reduce productivity. So, we always write automated tests after developing a feature and we try to be smart when choosing what component should be tested and when testing is not worthwhile –for example, when the new development is covered by another test at a different abstraction level.
Automated tests are part of the codebase and we strongly encourage team members to deliver code that is fully covered by tests. Automated tests not only dramatically reduce the chance of introducing new bugs when coding new features, but also provide valuable documentation. As such, they should be kept as simple as possible, with the aim that they always end up being extremely easy to read and understand.
Here are the guidelines we follow, in order to write simple and efficient tests:
- Use plain JUnit runner and Mockito, not some fancy runner or framework. Both JUnit and Mockito are predictable, stable and easy to understand.
- Instantiate mocks/stubs explicitly as class fields: this way everything is visible for the reader without having to navigate through other classes and/or configuration files (see Figure 1).
- Make test suite names correspond to the tested class name (Figure 1).
- Write descriptive test names that make it clear what the outcome of the tested operation should be (Figure 1).
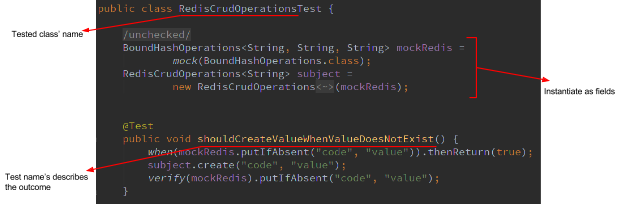
Figure 1 – A real-world test scenario.
- Write one test for each possible workflow: starting at the Happy Path and continue down different paths that diverge from the main one.
- Systematically organize each test logic as “AAA” (Arrange, Act, Assert). If you want to know more about this pattern, read Kent Beck’s Test-Driven Development: By Example, page 97.
- Keep the logic as simple, as possible: restrict it to just few lines of code –don’t even use “if” statements in your unit test logic, if you can avoid it. Only if you absolutely need to use complex statements should you employ an extract method –and, if you do, then use a name that describes what’s going on and don’t over-complicate it! It’s a code smell, so dividing the test in two parts would probably work out better (like in Figure 2, below, where “extractGroupIds” has been extracted from the test case).

Figure 2 – A method has been extracted to reduce the complexity of the test.
- Make as few assertions in each test as possible: ideally, just make one assertion per test. If there is more than one assertion relating to the same condition, extract a method with a descriptive name that encompasses the assertions that are related to each other (see Figure 3).
Figure 3 – A method has been extracted to group correlated assertions.
- Only reuse code when absolutely necessary: tests are not application code. When reading a test, you should already have all the necessary information to hand, without needing to navigate through more classes.
- Avoid using inheritance between test suites. The reason for this is analogous to the previous one: inheritance makes it more difficult to understand the purpose of the test.
- Avoid making tests dependent on their order of appearance, and also avoid making the result of one test dependent on the result of another.
- Test functionality, not how it was implemented: if the test checks how a class does something, every change to the class will impact on the test and, as a result, the test will end up repeating the app’s code. For example: don’t test that a DAO calls the database when creating a new object. Instead, test that after the object is created, it can be retrieved.
Integration tests
Once we’ve ensured that each class behaves as expected, then it’s time to analyze the interaction between different components, to validate that the system is working as a whole. It’s important to highlight that, just because two classes work correctly independently, it doesn’t necessary mean that they will work as expected when they have to interact with each other.
This is where we rely on the framework we use. Spring allows us to instantiate a particular application configuration for the purpose of testing. Within this configuration we keep all the components exactly as they will run in production, except for the external dependencies, which are mocked or embedded in the same JVM. This is very important. One of the reasons for this, is that we want tests to run quickly, so sending packets across the network is not an option. Another reason, besides performance, is that it’s a good practice for tests to be encapsulated, which helps us avoid the frustration of tests passing on the developer’s machine, but not on the CI server.
Following such practices enables us to write and run end-to-end functional tests. End-to-end testing seeks to confirm that integrated components of an application function as expected. For example, we can select a use case and test the whole flow, trying to reproduce it, programmatically. Another example would be sending a message to a messaging source and checking if the right command has been triggered: like a call to a web service or a database insertion.
The same rules for writing unit tests apply when writing integration tests. Integration testing doesn’t mean writing over-complicated test cases or increasing the dependencies of one test on another. On the contrary, integration tests should be simple, independent and efficient.
Practical advice: Run all tests periodically. Not just after you’ve finished coding a full feature. Organize your work into small steps that you can test individually. You may end up subdividing a larger task into several smaller ones, which is actually better practice.
For example, if you have two branches that each pass their own tests, when you merge them: run all the tests again, before moving forward to the next step. Merging two correct changes doesn’t mean that the result of the merge will be correct! Running tests often will also force you to write efficient tests that don’t take too much time to complete.
Phase 2: Continuous integration
We employ a Continuous Integration (CI) environment in which all our tests, both unit and integration tests, are run in a common configuration. We integrate our CI server with Gerrit, our preferred code review tool. When a developer pushes a change to Gerrit, the CI server runs automatically and scores the result with a +1, if the tests pass, or a -1, if they don’t. If the change receives a -1 from the CI server, then the reviewing team doesn’t need to spend time reviewing code that isn’t working.
In addition, we keep the CI status visible to everyone. It should be always green and the team should be aware of its status, at all times. For example, in one project, we decided to mount a screen on the office wall, to show the current status of the CI server for each sub project. This was in no way intended to shame people for failing tests, just to stress to the whole team how important it is for all tests to be showing as passed.

We also add a code coverage report to the CI status, so that the coverage is also visible to everyone in the team. Sometimes we set a minimum percentage of coverage as a standard for every project. In this way, we can compare numbers and discuss how to achieve better results.
Phase 3: Development environment
We deploy to the development environment when the CI server is green.
This environment is set up for developers to explore, try out new solutions but, mainly, to break things. Here, developers feel free to shut down services and deploy unstable features.
We set up an environment, configured to be as similar to the production environment as possible: with the same operating system, software versions, etc.
There, we can deploy the application, enabling us to test the deployment process and environment configurations that may have not been configured fully in the local testing environment.
Once all the environment-related variables have been tested, we can start manually testing the new functionalities and make sure everything works as expected.
Sometimes, we go one step further and simulate application users, employing automated scripts that can be left running, permanently. Simulating a real scenario helps to identify potential flaws that are difficult to find, just by inspecting the app manually.
Furthermore, we can practice the deployment process and test failure scenarios, like service nodes failing, connection problems, or any test scenario that would take too much effort to simulate using unit or integration tests.
Phase 4: Staging environment
We deploy to the staging environment when the feature code has been reviewed and the developer considers phase 3 to be complete.
The aim of the staging environment is to make sure that what we have developed is what the clients actually want.
During this stage, we start our QA and acceptance tests, hand-in-hand with our clients.
The staging environment is a phase that developers really don’t want to mess up! We want our clients to have a stable and predictable system that works.
During this phase, we only deploy stable and fully tested features, so this phase should only be used to validate functionality, not to find bugs.
Finally, and only once we have successfully completed all four of these phases, do we truly know that the application has been fully tested: unit by unit, with all units running together, and with all units working in two, separate production-simulating environments, one for developers and one for client acceptance.
These phases are ordered so that problems can be caught as early as possible, at a stage when they are easier to resolve; and long before be released into production. The overall idea being: the sooner you catch a problem, the easier it is to solve.
Discover more about our work in quality assurance and our QA Studio!
