

Author
Diego Muracciole
At Moove-it we have always cared about the community. This time, we wanted to create a space where we could learn and discuss about new technologies, share experiences and have a good time with anyone interested in the subject. With this in mind, it is how we celebrated our first-ever Moove-it Tech Meetup last July 27th: 3 talks, more than 70 guests, music, pizza, beer, and a lot of React!
So, why React? First of all, we already had experience working with it and we wanted to share it with our team. Also, we knew there was a huge interest for knowing what all the fuss with React was about. Even though it’s open-source since 2013, it was not until these last few months that we started hearing more and more about new libraries and people using (and loving) React.
We wanted the event to be dynamic and participative, so we divided it in three talks, 30 minutes each, with an open space for questions and debate at the end. The first one was a quick and yet deep introduction to React and Redux. These are subjects that typically are treated separately, but we wanted to give an insight on both since it’s more likely to be using them together when creating an app. The second one was about imperative vs. declarative JavaScript, explaining the key differences that structuring and writing code with React have over some other libraries such as jQuery. Finally, and to sum up the first two, the last talk was about explaining how React was used in a real project at Moove-it.
This is the first part of a series of posts that aims to give a deep insight of what is and how to build a React app, sharing what the talks were about. So, let’s start from the beginning.
React
Even though many who came to the meetup had previous experience and knew what React was, others didn’t. So the obvious starting point was to answer the following question:
What is React?
React is a JavaScript library for building user interfaces. Not bigger than that. Nothing more. It is developed and maintained by Facebook, which used it internally for awhile until 2013 when they open-sourced it. More and more, companies have been adopting it and libraries have been built on top of it.
One of the first questions a developer asks is what difference does it have with other frameworks that they already know. It’s natural: we use to compare new concepts to familiar ones in order to understand them. However, comparing React with Angular, Ember or whatever other framework, will probably lead to confusion. This is mostly due to the fact that React isn’t a framework by itself; the only thing that React does is output HTML and nothing more. React does not have features such as native event system or AJAX calls. This means that you can’t build a dynamic web app with React only. This is one of the first, but yet very important facts that you have to know before even starting to use React. Many actors come into play in a React app, which can be a bit frustrating if you’re just starting with it. It is frequently said that learning React isn’t hard; what’s hard is learning all the tools needed for building a React app.
This leads to our next question:
Why is React so compelling then?
Declarative
React wraps an imperative API into a declarative one. This means that we don’t tell React exactly how to do things, but we declare what we want to do. The easiest way to see this is by looking how React manages DOM changes: it removes every direct interaction with the DOM. No CSS selectors of any types are needed. Just change some data, and React handles the operations needed to see that change reflected in the DOM. The way to “change that data” isn’t trivial, and we will get to that further in this article.
This could be a bit ambiguous for someone who did not see yet a single line of React code, so we will resume this subject with more details and examples on the second part of this post.
Composable
React is all about Components. You can think of a component as any UI piece of the site that has a meaning, can be reusable and nested inside other component. In this way, we can create a mental model of the app based on Components, and not in HTML elements. This DOM abstraction comes with great benefits when we start to write code.
It’s also important to notice that a React Component is not just the markup of a piece of the site, but also the logic (JS code) and styles (CSS). This mixture of concerns within one single block is one of the most criticized points of React, but it gives us the advantage of knowing how a component will render in any possible scenario by just looking at one source file. No more callbacks spreaded all over the project that change the site. Isn’t that awesome?
Works great with teams
It’s very easy to split Components into different members of the team. Each Component is independent from others and has a defined interface which must follow. Having defined that, all the developers can work in parallel and then merge their progress pretty smoothly.
Virtual DOM
Before jumping into React code, it’s important to understand the concept of VirtualDOM. In any app, we will have some kind of model that will have to sync with the view layer (scope variable in Angular for example). Rendering all the app in each model update would work, but certainly wouldn’t be efficient. What React does is: it maintains an intermediate model between the state of the app and the real DOM, that preprocesses any change on that state and talks to the real DOM to apply those changes in an efficient way.
But, why don’t we just apply directly those changes into the DOM? Simply because DOM operations are very expensive. A DOM mutation can trigger many redrawing, layouting and painting operations that could be very time-consuming. What VirtualDOM does for us is to calculate and apply the minimal set of operations needed to switch from one state to a new one, reducing the bottleneck of DOM handling.
Let’s see this in action: Imagine a site that has a primary heading, a paragraph and an empty unordered list. The VirtualDOM tree would look something like this:
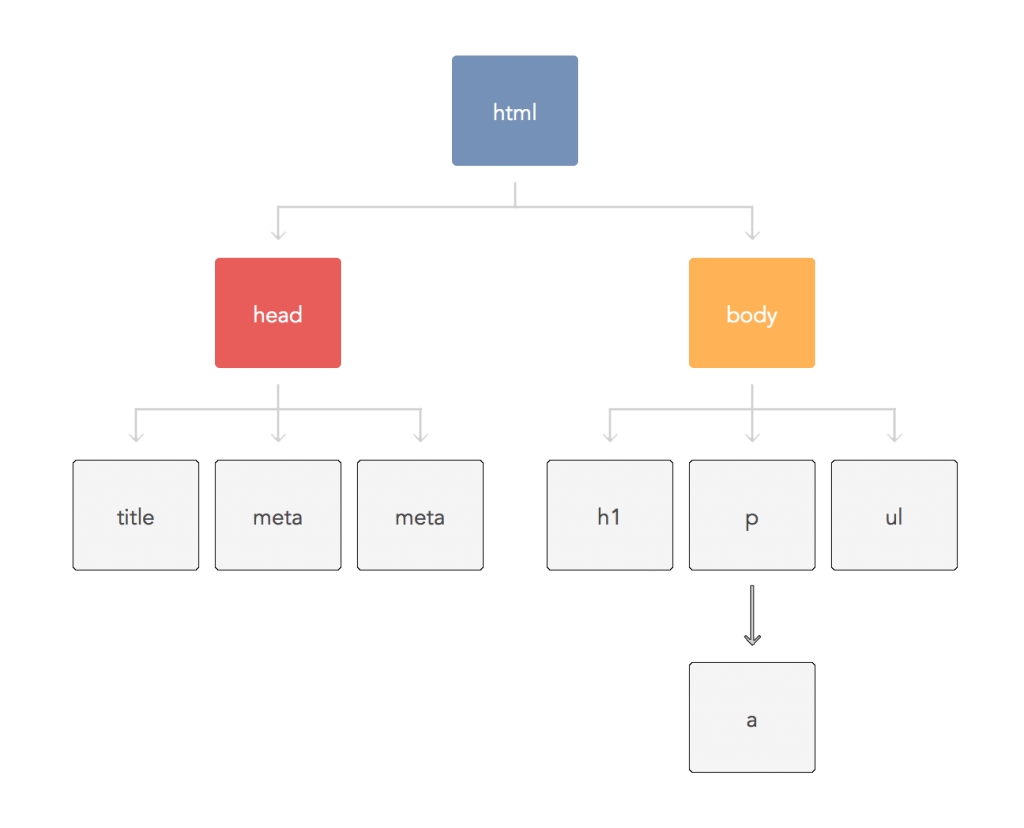
At some point, a response comes from the server with some useful data and we want to populate the list with it. What React does then is creating a new VirtualDOM tree and apply the needed changes to it:

Now that React knows the old and the new state of the app, he can compare them and calculate the minimal set of steps needed to pass from one state to the other:
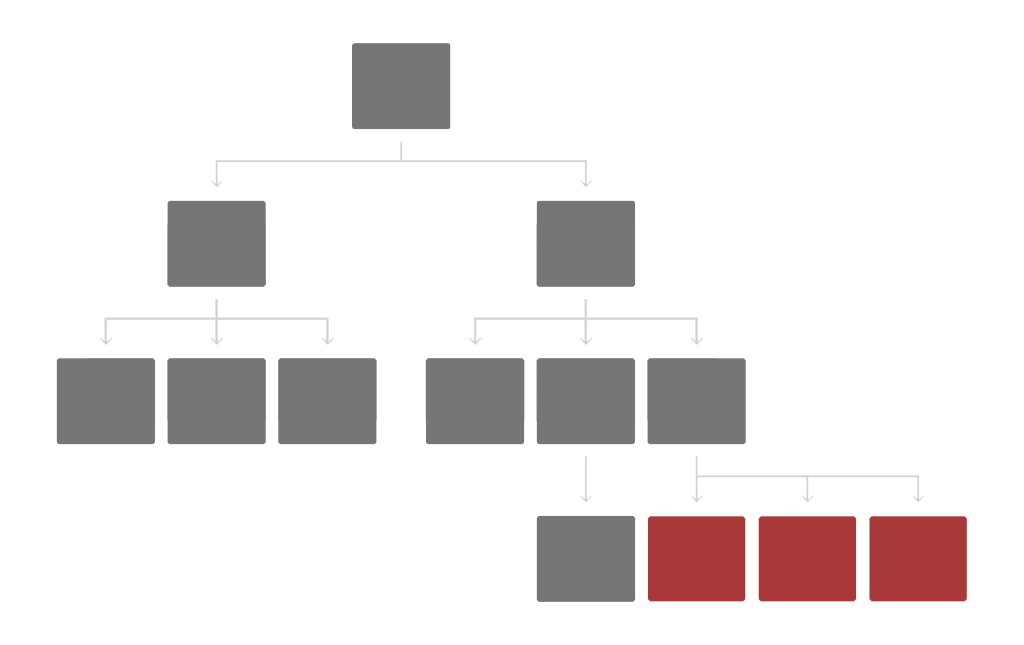
All it’s left to do is applying them into the real DOM and see the changes on the screen!
What about the code?
Congratulations! If you made it this far, it means you now know the basics of why to learn React and you’re ready to see some actual code.
Render method
The render method represents the starting point of any React app. It’s basically responsible for taking some React Element and render it into the page. We can see this process as a translation between the Virtual DOM to the real one.
ReactDOM.render(
  <h1>Hello, world!</h1>,
  document.getElementById(root)
);
It takes two arguments:
- A React Element. In the example, it’s just a heading, but as we will see later on, it can be any type of element that we might have defined.
- A root element used to render the value passed in the first parameter.
Note how the render method is part of the ReactDOM object. This is because React is shipped in many modules. For the web, we will need the React package as well as the ReactDOM package. While the first one is responsible for tasks from the library itself, the other one handles web-specific tasks.
Components
“A React Component is a highly cohesive building block for UI, loosely coupled with other components”
We can think of Components as the fundamental blocks from which we will build the app’s UI. They represent the proper separation of concerns within the application.
The easiest way to think about Components is to compare them with the HTML elements we already know. Let’s pick the a element for example: it has a specific meaning (render a link), has some styling (by default, blue), receives parameters (href in this case) and we could say that it even has some logic (underlined at hovering for example). React lets us define custom elements and treat them just like you would do with a link element in plain HTML. Of course, this is a very raw simplification, because React Components are extremely powerful and more extensible than regular HTML elements, but they have many things in common.
Component definition
There are two ways of defining a React Component, depending on whether you’re using ES6 or not, but they are essentially the same:
// Using createClass method

var Title = React.createClass({
  render: function() {
    return <h1>Hello world!</h1>
  }
});
// Using ES6 classes

class Title extends React.Component {
  render() {
    return <h1>Hello world!</h1>
  }
}
Each component must implement a render method. This method will return how that Component will be displayed in the screen (in this case, just by a heading). React.createClass method takes by only parameter an object that specifies the Component, with the render method within it. React.Component works as a base class from which we should extend to create the Component.
To sum up
We now know how to create a Component, and how to render it to the DOM. Let’s see them in action:
var Title = React.createClass({
  render: function() {
    return <h1>Hello world!</h1>
  }
});

ReactDOM.render(
  <Title/>,
  document.getElementById('root')
);
Result:

Voilà! We now have our first Component rendered in the page!
Protip: be careful with what render returns! It should always be one single element.
JSX
Did you notice some sort of weird syntax in the code above? Let’s say for example… HTML INSIDE JS?! Well, you are not alone: this is called JSX.
“JSX is an optional preprocessor to use HTML-like syntax in our code.”
What a Component returns via its render method is called a React Element and it’s natively created by calling the createElement method. What JSX enables us to do is writing this kind of statements in a way that feels so much familiar and similar to HTML syntax, so something like this:
React.createClass({
  render: function() {
    return <h1>Hello world!</h1>
  }
});
Becomes into something like this:
React.createClass({
  render: function() {
    return React.createElement(
      'h1', // Element type
       null, // Props
       "Hello world!" // Children
    )
  }
});
createElement takes three arguments:
- The type of the element. Could be some HTML basic type or one defined by us.
- The props to pass to the element, i.e. any argument that the element needs.
- The children of that element. Notice that this could be another createElement invocation.
So, we now see that what we wrote in our first Component isn’t actually HTML code but JS code with HTML syntax. Like we said before, the use of JSX isn’t mandatory, but it’s recommended if you don’t want to lose your mind when your Components start to grow.
Protip: because words such as “class” and “for” are reserved in JS, we must use “className” and “htmlFor” instead when we write code in JSX
Component Props
Props are read-only properties passed to a React Component via its attributes and accessible inside the Component via the props object. Unlike HTML elements that can receive string attributes (such as class or href), React Components can receive many other data types, such as numbers, booleans and even functions.
// The element

<Title
  color="red"
  fontSize="2em"
  hidden={true}
  />

// It's props

this.props = {
  color: 'red',
  fontSize: '2em',
  hidden: true,
  // ...
}
PropTypes
React gives us the ability to define what attributes a Component can receive and what type they should be. In a way, they allow us to define which interface is needed to use a Component. This comes very handy when someone else will use our Component.
The way we specify PropTypes in a Component may vary, depending on whether we are using ES6 classes or not, but they are basically the same:
// Using createClass method

var Serie = React.createClass({
  propTypes: {
    name: React.PropTypes.string.isRequired,
    seasons: React.PropTypes.number
  },

  render: function() { /* ... */ }
});
// Using ES6 classes

class Serie extends React.Component {
  render() { /* ... */ }
}

Serie.propTypes = {
  name: React.PropTypes.string.isRequired,
  seasons: React.PropTypes.number
}
Protip: bare in mind that React does not throw an error if a PropType is violated. All it does is logging a warning in our development environment.
DefaultProps
DefaultProps are almost the same as PropTypes but they define what value a prop must have in case it wasn’t passed in.
// Using createClass method

var Serie = React.createClass({
  getDefaultProps: function() {
    return {
      name: 'Game of Thrones'
      seasons: 1
    }
  }

  render: function() { /* ... */ }
});
// Using ES6 classes

class Serie extends React.Component {
  render() { /* ... */ }
}

Serie.defaultProps = {
  name: 'Game of Thrones'
  seasons: 1
}
Component State
The state consists of any piece of data that the Component needs in order to function properly. The Component may eventually adopt any given state while it is rendered in the page. Like props, states are accessible within the Component via an object this.state. This object is just a regular JS plain object, so we can define as many attributes as we want.
It is said that Components are state machines, that take a current state and render markup based on them. When the state changes, the Component re-renders to reflect that change in the screen.
Setting an initial state
Since the Component will use the state to generate some piece of UI, it’s obvious that we must set some initial values. For example, Which tab should be active by default? Or what price should I render when it is not specified?
Like in the previous examples, we have two different flavours for setting the initial state:
// Using createClass method

var Serie = React.createClass({
  getInitialState: function() {
    return {
      likes: 0,
      // ...
    }
  },

  render: function() { /* ... */ }
});
// Using ES6 classes

class Serie extends React.Component {
  constructor(props) {
    super(props);

    this.state = {
      likes: 0,
      //...
    }
  }

  render() { /* ... */ }
}
Changing the state
Ok, so we now have all the data we need to render the Component. Now, we just need a way to mutate this data in order to make our Component dynamic. For example, we would like to change the active tab. Luckily, React comes with a very handy method called setState:
var Serie = React.createClass({
  getInitialState: function() {
    return { likes: 0, /* ... */ }
  },

  like: function() {
    this.setState({
      likes: this.state.likes + 1
    })
  },

  render: function() { /* ... */ }
});
setState takes as a parameter an object with the new state that we want to set. What React does under-the-hood is merging this new state object with the current one, so any other state attribute that’s missing from the new object wouldn’t be affected.
Other than changing the state, setState is also responsible for another task: triggering UI updates. Remember how we said that once the state is changed, the view is updated? Well, it is setState who does this automagically for us. What it really does, is executing all the VirtualDOM cycle where the minimal set of changes are applied, making it very easy and yet efficient to pass from one state of the app to another.
Protip: When you’re in doubt about whether something should be part of the state or a prop, try to ask yourself who is responsible for handling that data. Remember: props are read-only and come from outside the Component. State is internal to the Component and it’s editable.
Component lifecycle
Last but not least, we have one more concept to talk about: lifecycle. A Component transits along the app through many states, starting before it is mounted into the DOM and ending when it is deleted from it.
React makes it possible for us to define a variety of callbacks throughout a Component’s lifecycle. It is not the aim of this article to explain them all (there are many), but to give a brief description of the most frequent ones and possible use cases:
- componentDidMount: called only once in the life of the Component right after it was added to the DOM (aka mounted). This callback is usually appropriate for making AJAX requests or setting timeouts or intervals.
- shouldComponentUpdate: this callback is invoked every time the state or a prop is changed. It should always return a boolean value, that defines whether the Component should re-renders (this means, a call of the render method) or not based on the current state/props and the new ones. This allows us to have a very fine-grained control on the Component output and also on the performance of the app, avoiding unnecessary renderings.
- componentWillUnmount: invoked once before the Component is removed from the DOM, or unmounted. If you define timeouts on the componentDidMount method, it is a good idea to close them here.
The end
These are the basics of React. You can now jump straight on creating your custom Components. Be creative with them! Just remember: a Component it’s just an object that renders HTML on the screen based on some arguments (props) and its state. Keep that always in mind.
However, there are important topics that this article does not cover that are crucial when creating a web app. For example, how do I structure a React project?, Where do I store global app data? These and some other questions will be answered on future posts to come. Stay tuned!
