
Quoting Eric Bidelman, an engineer at Google especially involved in this technology:
“Web components are a set of emerging standards that allow developers to expand HTML and its functionality”
And these standards are:
- Templates
- Custom Elements
- Shadow DOM
- Imports
I will try to give you a general sense of what these are.
Templates – Reusing HTML
Templates shouldn’t be a new concept to any developer out there. A lot of languages, libraries and frameworks use some kind of template engine. Let’s see how to use them:
<template>
  <h1>Hi there!</h1>
</template>
Here we are defining a new tag, called template and we could put any html markup we want inside it.
But, what’s the new thing here? It’s just a tag…
It is…but the content inside the template will not be rendered in the page until we explicitly activate it. Even better, no external content like images or videos will be loaded, nor javascript code inside a script tag will be executed.
How do we activate a template?
// select the template
var template = document.querySelector('#mytemplate');

// import a copy of the template’s content
var clone = document.importNode(template.content, true);

// append the content to the body
document.body.appendChild(clone);
Custom Elements – Creating tags
HTML provides us with a set of tags that we use to define the structure of our web. After using them you will realize that there are not too many and most of the time they don’t describe what you are building. This is how it looks if we inspect the markup of a site like Twitter:

It’s simply too hard to know what is going on, it lacks expressivity.
Here is where custom elements fit well. We can create our own tags that the browser will treat as normal tags. And we can name it! It only requires to have a dash (-) in its name, to distinguish from the default tags. Also we can define our own public API with custom attributes.
Let’s define our tag and register it in the DOM:
<moove-it>
  <template id="phrase">
   Software for Human needs.
  </template>
</moove-it>
<script>
  //register our element
  var mooveIt = document.registerElement('moove-it');
</script>
We can see in Chrome DevTools:

We are able to see the text “Software for human needs” but it’s not displayed in the browser. This is because we put it inside a template and like we said it will not be rendered until we activate it.
<moove-it>
  <template id="phrase">
   Software for Human needs.
  </template>
</moove-it>

<script>
  //register our element
  var mooveIt = document.registerElement('moove-it');

  //get and clone the template
  var mooveItTemplate = document.querySelector('#phrase');
  var clone = document.importNode(mooveItTemplate.content, true);

  // append the content of the template to our
  document.body.appendChild(clone);
</script>
And there it is! Our first custom element, using templates.
Shadow DOM – Encapsulation
If you want to build a small widget within your page you will face one big problem: encapsulation. The DOM tree lacks of it.
Your special widget may have CSS classes, ids and javascript code that use this to implement some behavior. You have to pay special attention to this, since it could accidentally apply to other parts of the page.
So Shadow DOM is the component we will use to separate the content, and it’s functionality, from the presentation of our element.
To enable it in DevTools (Chrome 35+), just right click in Chrome, go to inspect element, and in the settings you can activate ‘Show user agent Shadow DOM‘
Now you will be able to see a node called “#shadow-root” inside our moove-it tag, and inside of it the content of the element. This separation will enable us, among other things, to style our element without affecting the rest of the page.
Let’s see an example of how to use this feature. We will create our own custom tag, using templates and encapsulate its style and content, using Shadow DOM.
<body>
 <p>Moove-it </p>

 <moove-it name="moove-it" constructor="MooveIt">
 </moove-it>

 <template id="phrase" >
 <style>
   p {
    background: orange;
    color: white;
   }
 </style>

   <p>Software for human needs.</p>
</template>

 <script >
  // register our custom element
  var mooveIt = document.registerElement('moove-it');

  // append to the body
  document.body.appendChild(new mooveIt());

  //select element
  var mooveItElement = document.querySelector('moove-it');

  //select template
  var template = document.querySelector('#phrase');

  // create shadow root and fill with the content of the template
  mooveItElement.createShadowRoot().appendChild(template.content);
 </script>

</body>
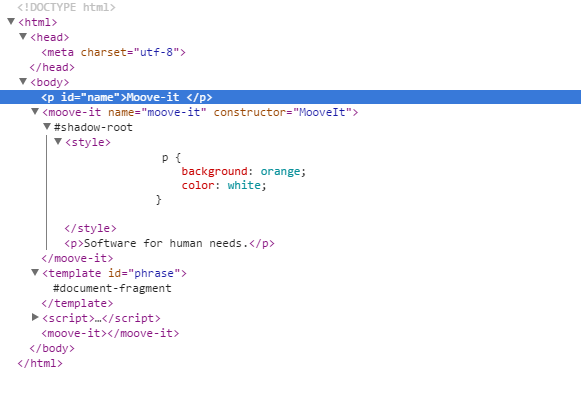
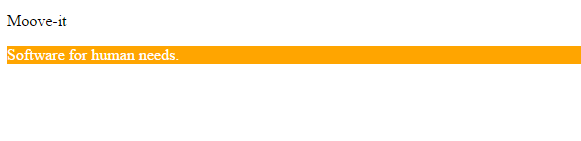
We can see how the browser sets the paragraph text inside our element with the orange background but doesn’t do the same with the <p> tag outside of it, even though we didn’t declare anything special in our CSS. The end-user will only see a custom tag that will have all the style and content built-in. This is the encapsulation we want for the web!
Imports – Including components
HTML imports provide us a way to include HTML documents inside other HTML. If you are a web developer you know that if you want to include your CSS files you need to do something like this:
<head>
  <link rel="stylesheet" type="text/css" href="main.css">
</head>
In a similar way we are going to import a document:
<head>
  <link rel="import" href="/path/moove-it.html">
</head>
It is worth mentioning that importing an HTML file doesn’t mean to copy all its content. What we are doing is telling the parser to go and fetch the content so we can use it. The great thing about this, is that we get to decide whether to use the entire document or just a part of it.
To access we use: var documentContent = document.querySelector(‘link[rel=”import”]’).import;
and inside documentContent we have our new document to use it as needed.
This gives us the opportunity to start creating reusable components that we can import when we need them without repeating code, which of course, is a great thing!
Resources
If you got really excited about Web Components and want to know more about it please check these talks:
Web Components: A Tectonic Shift for Web Development – Google I/O 2013
Building modern apps with Polymer & Web Components
And these articles too:
A Detailed Introduction To Custom Elements
Custom Elements defining new elements in HTML
And that’s it… I hope you now have a better understanding of what this new technology is capable of doing and start creating your reusable components to share with the community 🙂